avatar

Qt作业二:画图板

一、界面设计

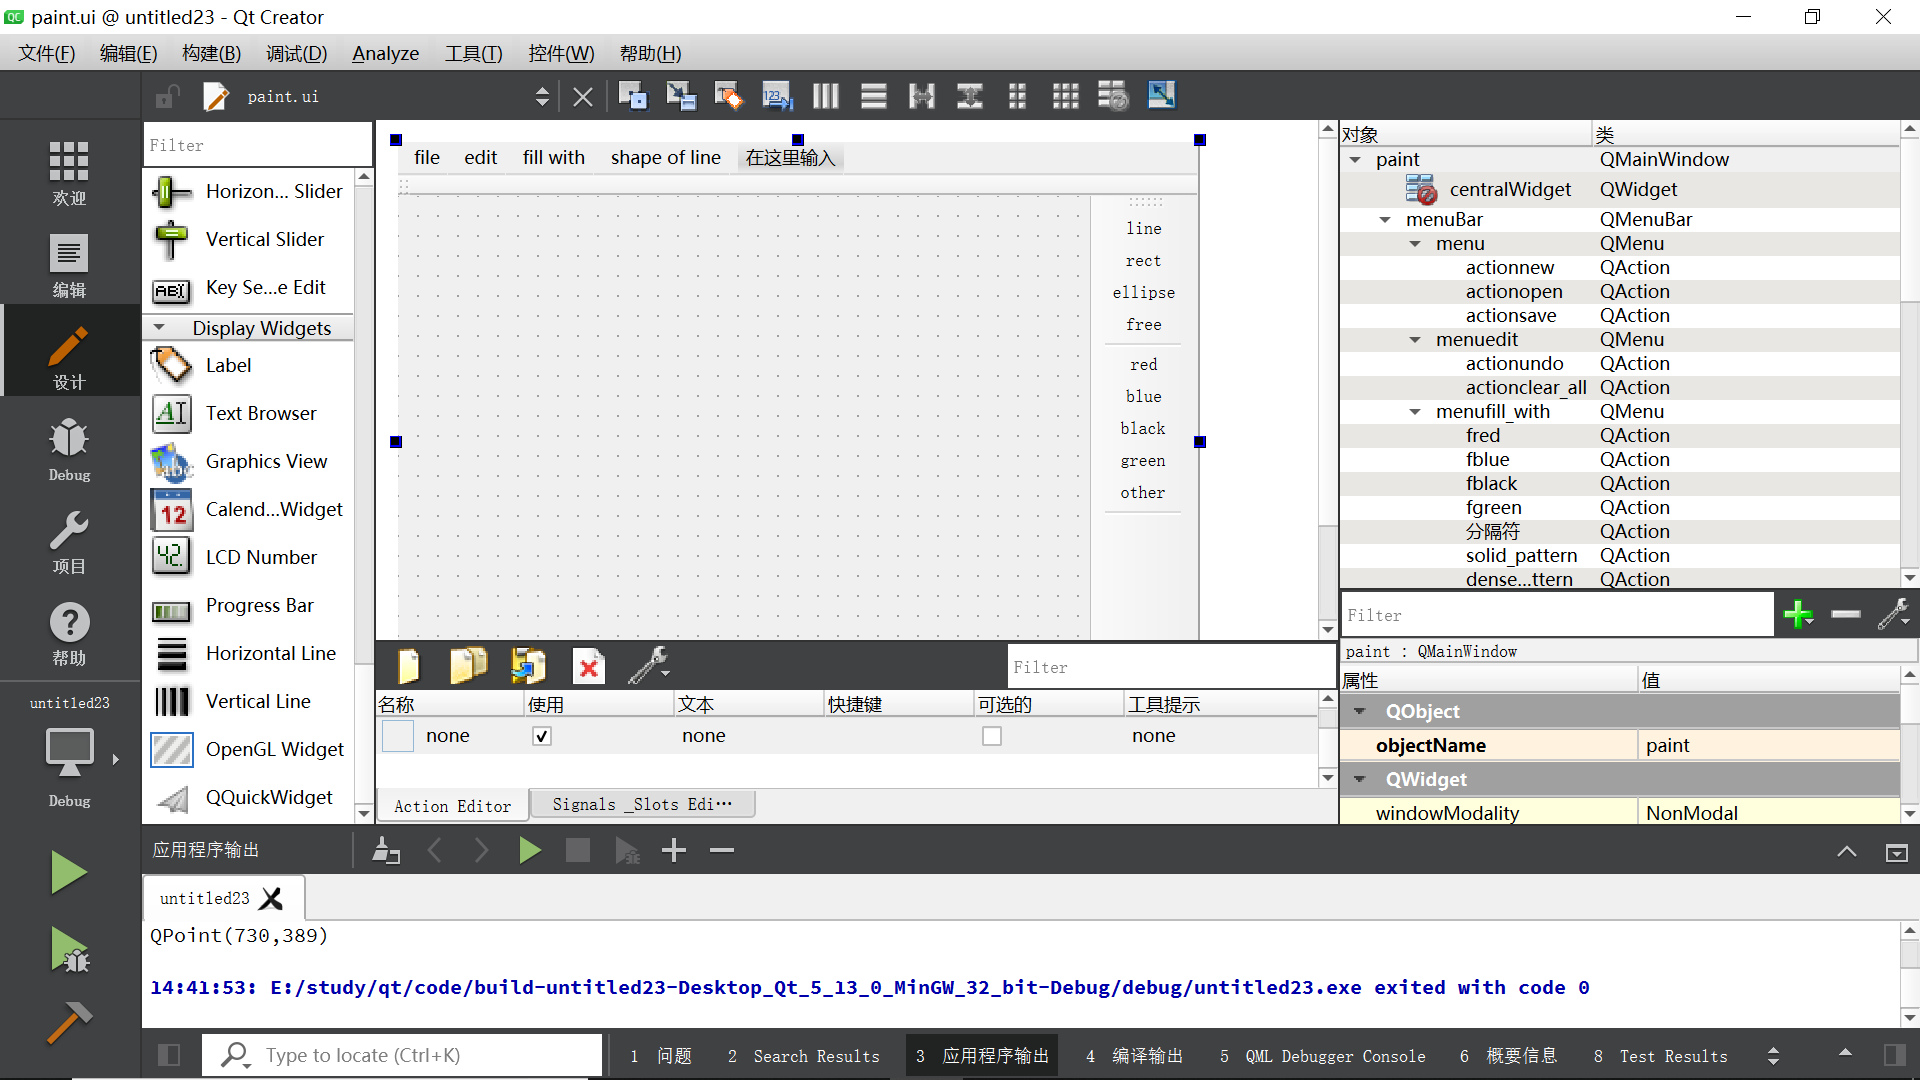
利用designer设计menubar和toolbar
遇到的问题和解决方法:
toolbar和menubar重叠,拖动toolbar部件至屏幕右侧即可。
image_1df8880jt10m8g53v041efd6j29.png-246.9kB
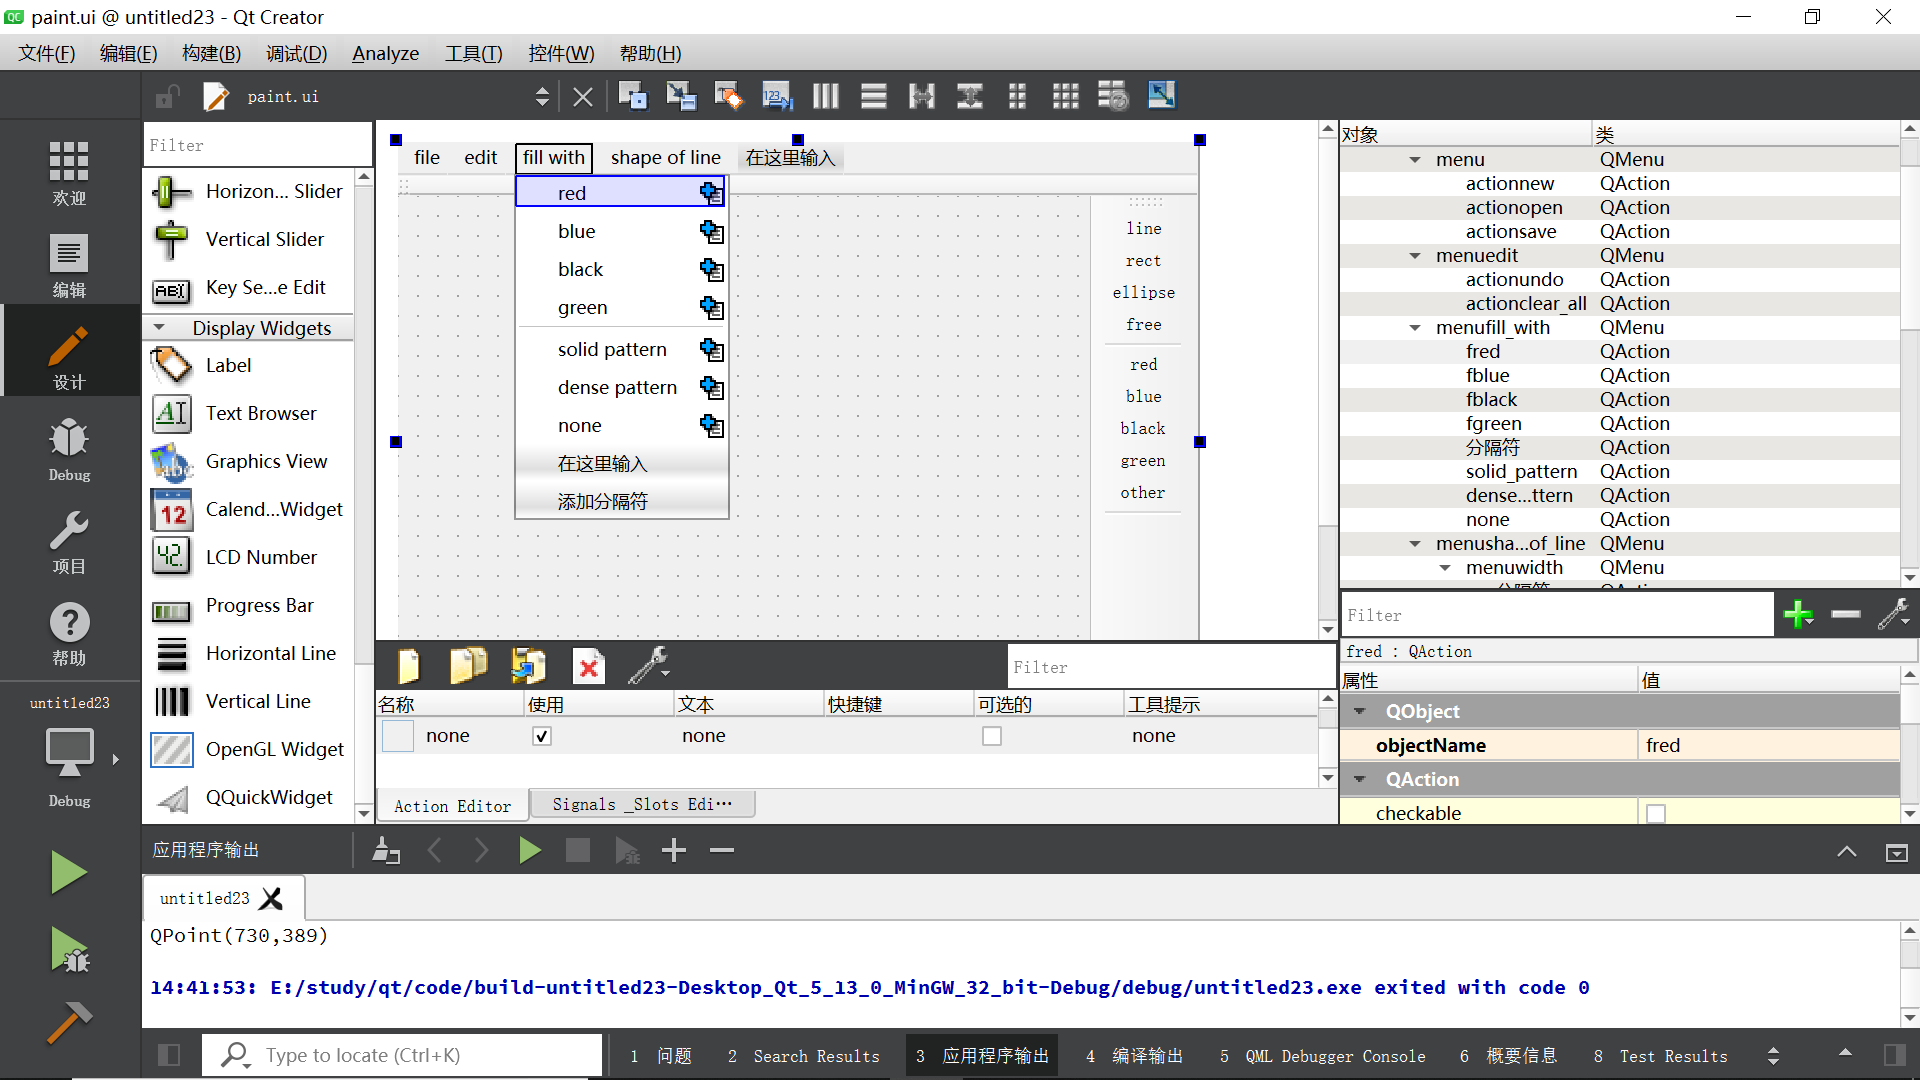
menubar中可以添加子选项
image_1df88esf0le118bvdh91a0b130d9.png-256.2kB


二、paint类属性

QPixmap *pix;//设置画图背景
QPoint start;//鼠标按下时的坐标
QPoint end;//鼠标抬起时的坐标
int status;//画图状态,1:直线,2:矩形,3:椭圆,4:自由绘图
QPen pen;//设置线条的属性
QBrush brush;//设置填充属性

三、paint类protected成员

protected:
void mousePressEvent(QMouseEvent *event);//鼠标按下事件
void mouseMoveEvent(QMouseEvent *event);//鼠标移动事件
void mouseReleaseEvent(QMouseEvent *);//鼠标释放事件
void paintEvent(QPaintEvent*);//绘画事件

函数定义:

void paint::mousePressEvent(QMouseEvent *event)
{
start=event->pos();//获得鼠标点击坐标

}
void paint::mouseReleaseEvent(QMouseEvent *event)
{
end=event->pos();
qDebug()<<start<<endl<<end<<endl;
QPainter *painter=new QPainter(pix);
painter->setPen(pen);//设置线条属性
painter->setBrush(brush);//设置笔刷属性
switch (status) {
case 1://画直线
{
painter->drawLine(start,end);
break;
}
case 2://画矩形
{

int width=end.x()-start.x();
int height=end.y()-start.x();
painter->drawRect(start.x(),start.y(),width,height);
break;

}
case 3://画椭圆
{
int width=end.x()-start.x();
int height=end.y()-start.x();
painter->drawEllipse(start.x(),start.y(),width,height);
break;
}
}
this->update();
delete painter;

}
void paint::paintEvent(QPaintEvent *)
{

QPainter painter(this);
painter.drawPixmap(QPoint(0, 0), *pix);


}
void paint:: mouseMoveEvent(QMouseEvent *event)
{
if(status==4)//绘制鼠标移动轨迹
{
QPainter* painter=new QPainter(pix);
end=event->pos();
painter->setPen(pen);
painter->drawLine(start,end);//每一次移动画直线
this->update();
start=end;//下一次绘制的开始点是这次的结束点
delete painter;//若无delete则只可以绘制一次

}
}

遇到的问题和解决方法:

painter在完成每次绘制时需delete,否则无法进行下一次绘制


四、构造函数

paint::paint(QWidget *parent) :
QMainWindow(parent),
ui(new Ui::paint)
{
ui->setupUi(this);

//设置画布
pix=new QPixmap(this->size()*5);
pix->fill(Qt::white);

//设置初使属性
brush.setColor(Qt::NoBrush);
status=1;

//连接信号和槽
connect(ui->line,SIGNAL(triggered(bool)),this,SLOT(status_line()));
connect(ui->rect,SIGNAL(triggered(bool)),this,SLOT(status_rect()));
connect(ui->ellipse,SIGNAL(triggered(bool)),this,SLOT(status_ellipse()));
connect(ui->actionfree,SIGNAL(triggered(bool)),this,SLOT(status_free()));
connect(ui->actionred,SIGNAL(triggered(bool)),this,SLOT(change_color_red()));
connect(ui->actionblue,SIGNAL(triggered(bool)),this,SLOT(change_color_blue()));
connect(ui->actiongreen,SIGNAL(triggered(bool)),this,SLOT(change_color_green()));
connect(ui->actionblack,SIGNAL(triggered(bool)),this,SLOT(change_color_black()));
connect(ui->action2,SIGNAL(triggered(bool)),this,SLOT(penwidth2()));
connect(ui->action5,SIGNAL(triggered(bool)),this,SLOT(penwidth5()));
connect(ui->action8,SIGNAL(triggered(bool)),this,SLOT(penwidth8()));
connect(ui->action10,SIGNAL(triggered(bool)),this,SLOT(penwidth10()));
connect(ui->solid_line,SIGNAL(triggered(bool)),this,SLOT(set_solid()));
connect(ui->dash_line,SIGNAL(triggered(bool)),this,SLOT(set_dash()));
connect(ui->dash_dot,SIGNAL(triggered(bool)),this,SLOT(set_dashdot()));
connect(ui->dash_dot_dot,SIGNAL(triggered(bool)),this,SLOT(set_dashdotdot()));
connect(ui->dot_line,SIGNAL(triggered(bool)),this,SLOT(set_dot()));
connect(ui->fred,SIGNAL(triggered(bool)),this,SLOT(set_fill_red()));
connect(ui->fblue,SIGNAL(triggered(bool)),this,SLOT(set_fill_blue()));
connect(ui->fblack,SIGNAL(triggered(bool)),this,SLOT(set_fill_black()));
connect(ui->fgreen,SIGNAL(triggered(bool)),this,SLOT(set_fill_green()));
connect(ui->solid_pattern,SIGNAL(triggered(bool)),this,SLOT(set_solid_pattern()));
connect(ui->dense_pattern,SIGNAL(triggered(bool)),this,SLOT(set_dense_pattern()));
connect(ui->none,SIGNAL(triggered(bool)),this,SLOT(set_none_pattern()));
}

遇到的问题和解决方法:

  • 可以获得鼠标事件坐标,但无法绘制,解决方法:
    pix=new QPixmap(this->size()*5);//结构函数
    QPainter *painter=new QPainter(pix);//绘制函数
  • 点击menubar中label发出的信号槽函数无法接收到:
    原connect写法:
    connect(ui->line,SIGNAL(clicked()),this,SLOT(status_line()));
    clicked()改为triggered(bool)即可

五、槽函数:

public slots:
//设置绘制形状
void status_line();
void status_rect();
void status_ellipse();
void status_free();//绘制鼠标轨迹
//设置线条颜色
void change_color_blue();
void change_color_red();
void change_color_green();
void change_color_black();
//设置线条宽度
void penwidth2();
void penwidth5();
void penwidth8();
void penwidth10();
//设置线条样式
void set_solid();
void set_dash();
void set_dot();
void set_dashdot();
void set_dashdotdot();
//设置填充颜色
void set_fill_red();
void set_fill_blue();
void set_fill_green();
void set_fill_black();
//设置填充样式
void set_solid_pattern();
void set_dense_pattern();
void set_none_pattern();

槽函数定义示例:

void paint::status_line()
{
status=1;
}
void paint::change_color_red()
{
pen.setColor(Qt::red);
//注意书写格式,不可以写为pen.setColor("red");否则无法传入颜色
}
void paint::penwidth5()
{
pen.setWidth(5);
}
void paint::set_dash()
{
pen.setStyle(Qt::DashLine);
}
void paint::set_fill_blue()
{
brush.setColor(Qt::blue);
}
void paint::set_dense_pattern()
{
brush.setStyle(Qt::Dense7Pattern);
}
void paint::set_none_pattern()
{
brush.setStyle(Qt::NoBrush);
}

遇到的问题和解决方法

  • 信号和槽函数无法连接:
    • 检查信号和发送信号的来源是否对应
    • 检查信号和槽的拼写是否准确
    • 利用qDebug()进行调试
  • brush必须设置填充样式,否则无法填充

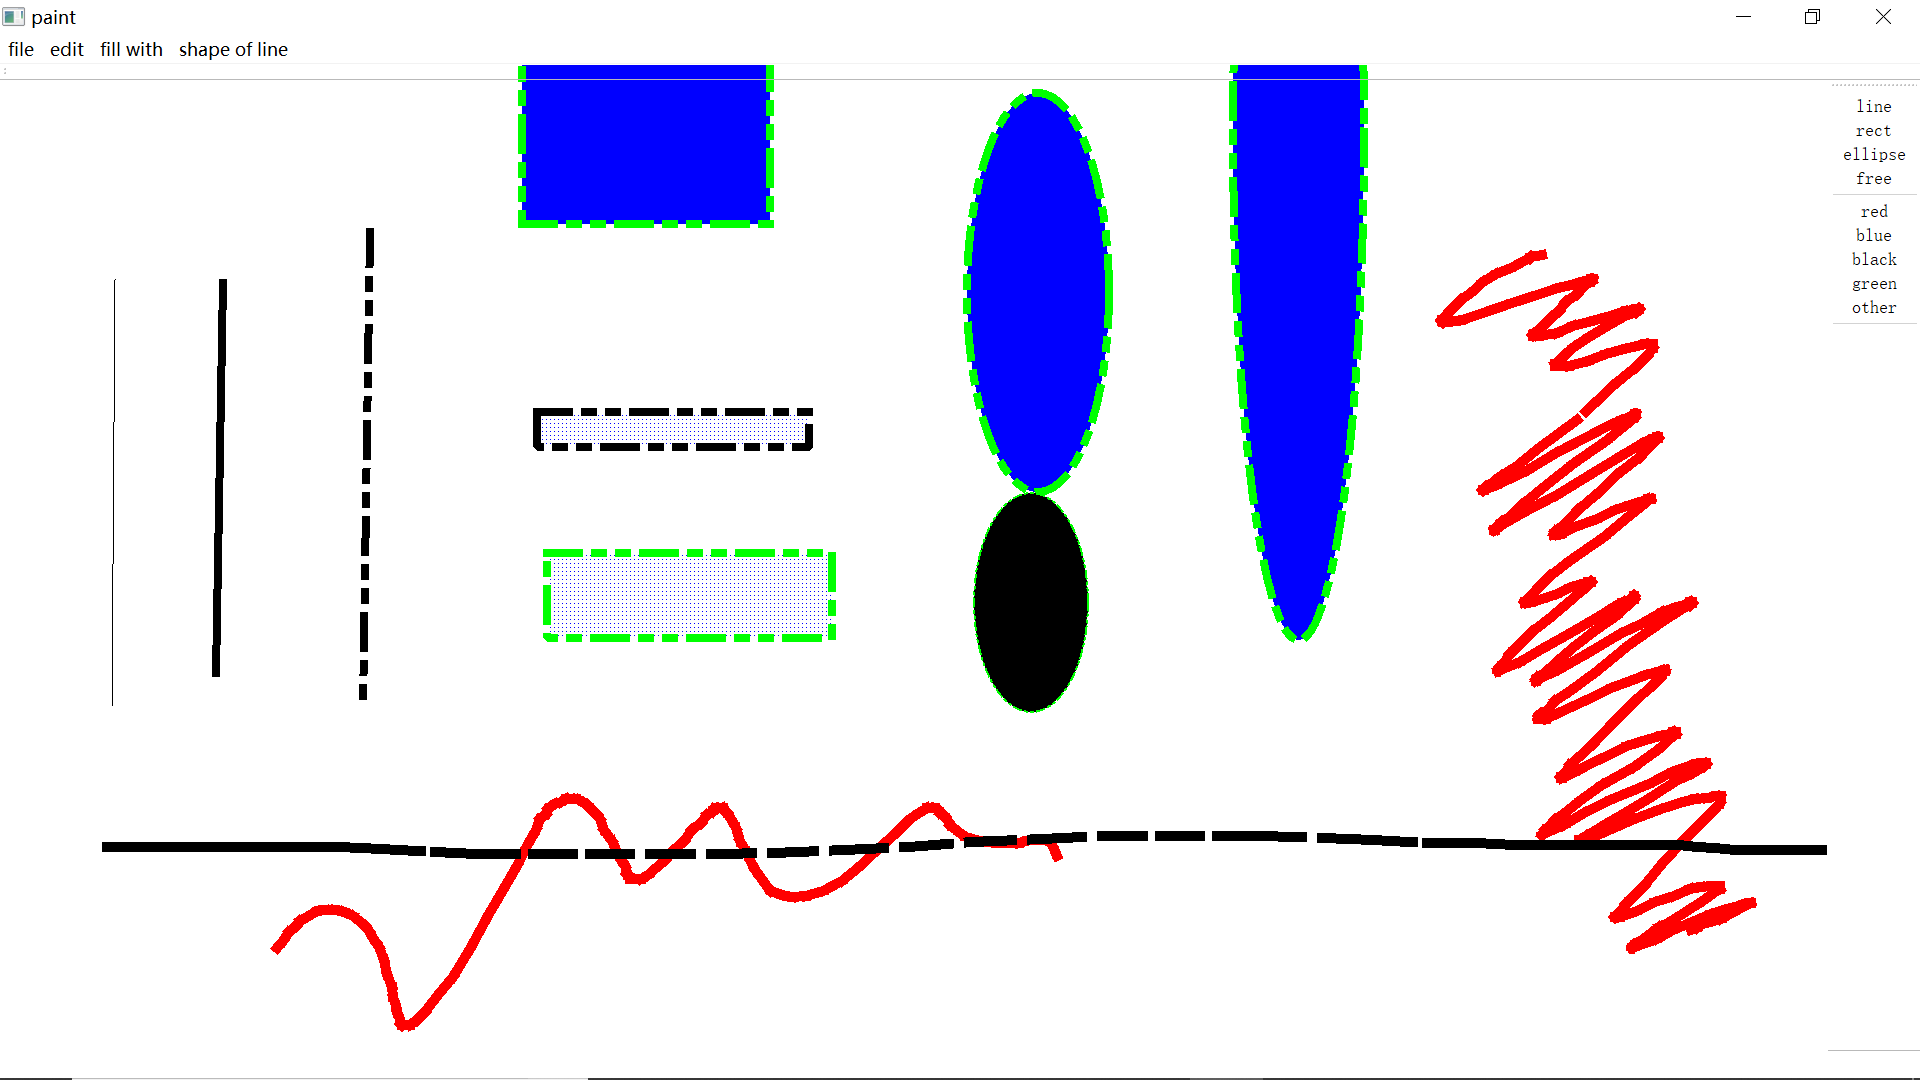
六、成果展示

image_1df8akslg1oo5li7b5jp314rb16.png-79.6kB

Author: Michelle19l
Link: https://gitee.com/michelle19l/michelle19l/2019/08/31/Qt/Qt作业二——画图板/
Copyright Notice: All articles in this blog are licensed under CC BY-NC-SA 4.0 unless stating additionally.
Donate
  • 微信
    微信
  • 支付寶
    支付寶